
Client Portal: Forms
With the BreezyNotes client portal, you can recreate most of your intake documentation and give your clients the opportunity to complete and eSign any form you make.
You clients can go to “Forms” in the Client Portal, choose the form they want to complete and add it to their “My Forms” list. When completed, they can submit it and the provider will receive a message in their BreezyNotes inbox and the form will be accessible under “Portal Forms” in that client’s chart.
Jump to:
Building Forms
Field Options
Clients’ Forms Interface
Building Forms
Our forms tool has a number of elements you can use:
- Header – Use this for titles and headings.
- Paragraph – This is for text. Copy and paste the verbiage from your intake documents into this field. Copying from Microsoft word works best.
- Text Field – This is a one-line field that can be used for eSignatures, name entry, or other basic data gathering.
- Text Area – This is a larger area that can be used when more narrative-based data is being gathered or you want to give your clients extra room to write.
- Checkbox Group – Allows clients to choose multiple options from a list.
- Radio Group – Allows clients to choose one option from a list.
- Select – Allows clients to choose one options from a dropdown list.
- Date Field – Allows clients to choose a date on a calendar.
- Number – Restricts clients to only entering numbers.
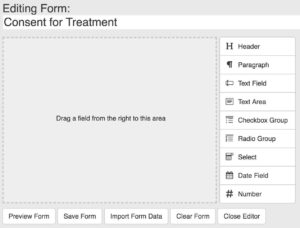
Drag and drop any of these fields into the editing area, then click on the Pencil icon to modify and view options. Here’s what each field looks like in the editor:
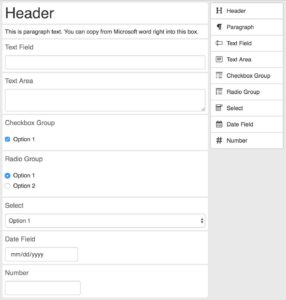
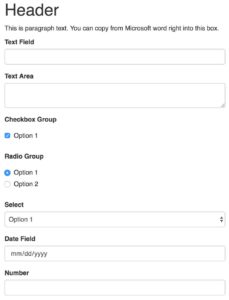
Click “Preview” at the bottom of the editor to see a preview of your form:
Field Options
Each Field type will have different options available to you. Here’s a quick outline of what each one does:
Header – Use this for titles and headings.
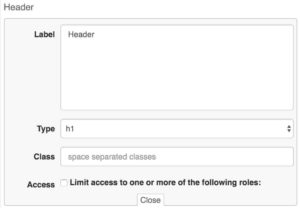
Label – This is the text of your header.
Type – Determines size of header. h1=large, h2=medium, h3=smaller.
Class – Used by BreezyNotes for advanced form customizations.
Access – Limit access so only the administrator can see the field.
Paragraph – This is for text. Copy and paste the verbiage from your intake documents into this field. Copying from Microsoft word works best.
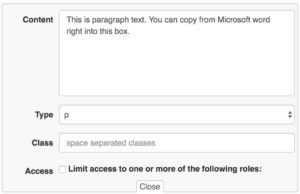
Content – This is where you paste or type the copy you’d like.
Type – Used by BreezyNotes for advanced form customizations.
Class – Used by BreezyNotes for advanced form customizations.
Access – Limit access so only the administrator can see the field
Text Field – This is a one-line field that can be used for eSignatures, name entry, or other basic data gathering.
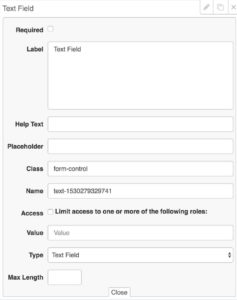
Required – Make this field required.
Label – The name of your field.
Help Text -Adds a ‘?’ symbol by the field label, and any text entered here will pop up when a client hovers their mouse over it.
Placeholder – Puts sample text in the field before the client enters anything.
Class – Used by BreezyNotes for advanced form customizations.
Name – Used by the system to differentiate the field.
Access – Limit access so only the administrator can see the field.
Value – Puts an actual value in the field before the client enters anything.
Type – Change the type of text field
Max Length – Limits the number of characters that can be entered in the field.
Text Area – This is a larger area that can be used when more narrative-based data is being gathered or you want to give your clients extra room to write.

Required – Make this field required.
Label – The name of your field.
Help Text -Adds a ‘?’ symbol by the field label, and any text entered here will pop up when a client hovers their mouse over it.
Placeholder – Puts sample text in the field before the client enters anything.
Class – Used by BreezyNotes for advanced form customizations.
Name – Used by the system to differentiate the field.
Access – Limit access so only the administrator can see the field.
Value – Puts an actual value in the field before the client enters anything.
Type – Change the type of text field
Max Length – Limits the number of characters that can be entered in the field.
Rows – Determines the height of the Text Area field.
Checkbox Group – Allows clients to choose multiple options from a list.
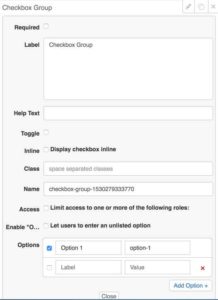
Required – Make this field required.
Label – The name of your field.
Help Text -Adds a ‘?’ symbol by the field label, and any text entered here will pop up when a client hovers their mouse over it.
Toggle – Instead of a checkbox, presents the options as a toggle
Inline – Displays the checkbox options horizontally across the screen rather than stacking.
Class – Used by BreezyNotes for advanced form customizations.
Name – Used by the system to differentiate the field.
Access – Limit access so only the administrator can see the field.
Enable “Other” – Adds an “Other” checkbox. When checked a small text field appears for them to add their item.
Options – These will become the options listed. Both a Label and a Value are required.
– The Label is what the client sees as an option.
– The Value is what you see once they submit the form.
Radio Group – Allows clients to choose one option from a list.
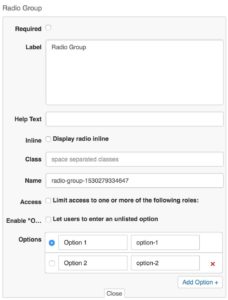
Required – Make this field required.
Label – The name of your field.
Help Text -Adds a ‘?’ symbol by the field label, and any text entered here will pop up when a client hovers their mouse over it.
Inline – Displays the checkbox options horizontally across the screen rather than stacking.
Class – Used by BreezyNotes for advanced form customizations.
Name – Used by the system to differentiate the field.
Access – Limit access so only the administrator can see the field.
Enable “Other” – Adds an “Other” checkbox. When checked a small text field appears for them to add their item.
Options – These will become the options listed. Both a Label and a Value are required.
– The Label is what the client sees as an option.
– The Value is what you see once they submit the form.
Select – Allows clients to choose one or multiple options from a dropdown list.
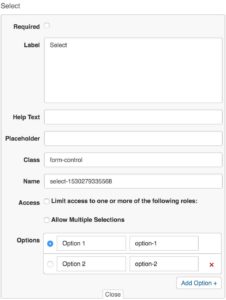
Required – Make this field required.
Label – The name of your field.
Help Text -Adds a ‘?’ symbol by the field label, and any text entered here will pop up when a client hovers their mouse over it.
Toggle – Instead of a checkbox, presents the options as a toggle
Inline – Displays the checkbox options horizontally across the screen rather than stacking.
Class – Used by BreezyNotes for advanced form customizations.
Name – Used by the system to differentiate the field.
Access – Limit access so only the administrator can see the field.
Allow Multiple Selections – Allows user to Ctrl-Click or Cmd-Click multiple options from the dropdown box.
Options – These will become the options listed. Both a Label and a Value are required.
– The Label is what the client sees as an option.
– The Value is what you see once they submit the form.
Date Field – Allows clients to choose a date on a calendar.
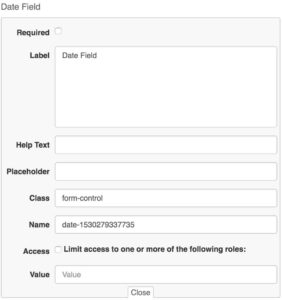
Required – Make this field required.
Label – The name of your field.
Help Text -Adds a ‘?’ symbol by the field label, and any text entered here will pop up when a client hovers their mouse over it.
Placeholder – Puts sample text in the field before the client enters anything.
Class – Used by BreezyNotes for advanced form customizations.
Name – Used by the system to differentiate the field.
Access – Limit access so only the administrator can see the field.
Value – Puts a value in the field before the client enters anything.
Number – Restricts clients to only entering numbers.
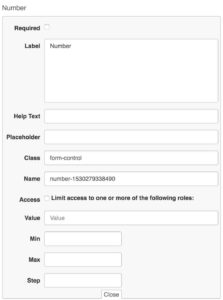
Required – Make this field required.
Label – The name of your field.
Help Text -Adds a ‘?’ symbol by the field label, and any text entered here will pop up when a client hovers their mouse over it.
Placeholder – Puts sample text in the field before the client enters anything.
Class – Used by BreezyNotes for advanced form customizations.
Name – Used by the system to differentiate the field.
Access – Limit access so only the administrator can see the field.
Value – Puts a value in the field before the client enters anything.
Min, Max, Step – Currently unused.
Client Portal Forms Interface
The Client Portal Forms Interface allows clients to view, complete and submit forms. It is made up of a dropdown where your custom forms are located, the “My Forms” list where all incomplete, saved and submitted forms are stored.
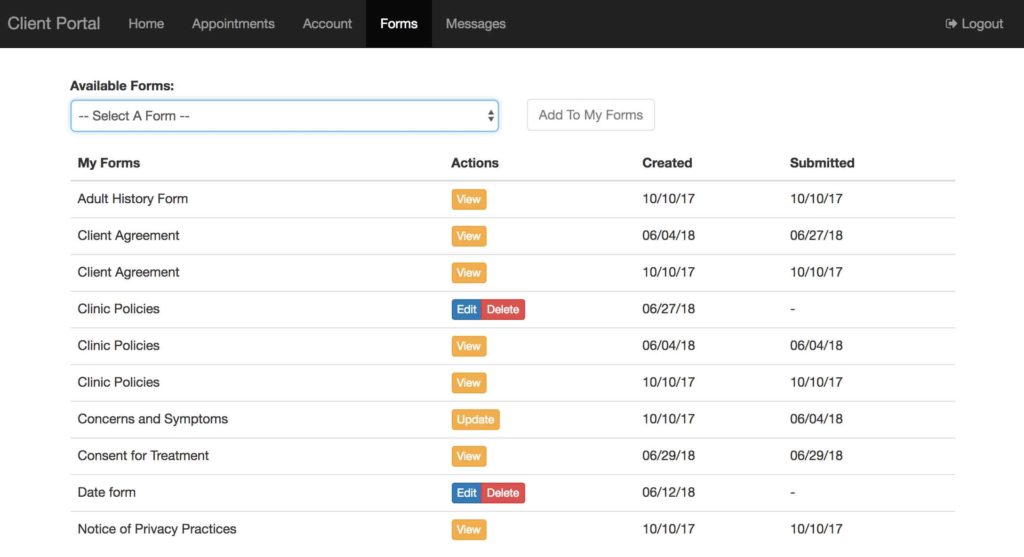
There are three unique forms that a client can see in “My Forms”:
1. Concerns and Symptoms – This form is in every client’s My Forms list. When a client completes this form, it will pre-populate the Diagnostic Assessment’s Client Generated Concerns and Symptoms section.
2. Individual Treatment Plan -When a provider completes an Individual Treatment Plan, they can Check the “Publish to Client Portal for sign-off” box to send it to the client’s My Forms list.
![]()
When submitted, the Individual Treatment Plan appears in the client’s My Forms list where they can click “Sign-off” to review and eSign their treatment plan.

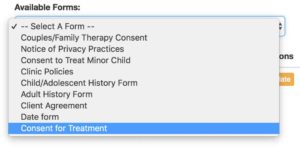
3. Custom Forms – Any forms that you have created will be located in the Select a Form dropdown. After selecting a form to complete, the client clicks the “Add to My Forms” button to open the form.
Submitting Forms
The client can save the form, close it or save and submit it to the provider.
![]()
Saving and submitting locks the form on the client side. The provider receives a message and they can review the form by going to Portal Forms in the client chart where they can View, Print, Request Updates or Delete.
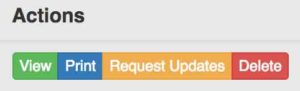
If the Provider chooses “Request Updates”, a message will be sent to the client and the form will become editable again in the client’s My Forms list.