
Upload Documents and Files (ARMHS)
17.01.2019
ARMHS
In BreezyNotes EHR, every client has a place in their chart where you can upload files from your computer. You can also attach files to a specific encounter for later viewing.
Uploading the File
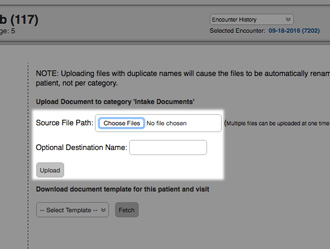
To upload a file to the client chart:
- Navigate to the client chart.
- Click “Client Uploads” link.

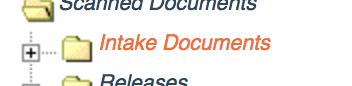
- Click “Scanned Documents” folder (and a specific folder if you use them to organize your files).
If you’d like to customize your folder list, please contact Support.
- Click “Choose Files” on the right and select the file from your computer that you wish to upload.
- Click “Upload”.
Move a File to a New Folder/Category
- Preview the document by clicking on it in the folder
- In the “Move” section, click the “Move Document to Category” dropdown.

- Choose the new folder/category.
- Click the Submit button
Move a File to a Different Client
- Preview the document by clicking on it in the folder
- In the “Move” section, enter the client’s ID # in the “Move to Patient #” box.

- Click the Submit button
Attach the File to a Specific Client Encounter
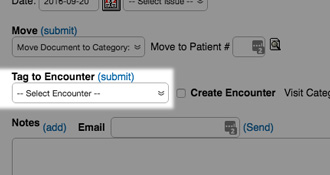
If you’d like to attach an uploaded file to a specific client encounter:
- Find the document you just uploaded and click on it.
You may have to click the plus sign ( ) to open the folder and review your uploaded documents.
 - Under the “Tag to Encounter” dropdown, select the Date of Service tied to your upload.
- Click the “(submit)” link next to the “Tag to Encounter” heading.
- Now if you ever want to access that file, you can find it by navigating to that encounter in the client’s encounter history.
Customize the File Structure
If you’d like to customize the file structure of your Scan Documents folder, we can do that for you! Just submit a request to our support team with the folders you’d like added!